To install a gutter downspout elbow, first measure the length of the downspout you will be using. Cut a piece of gutter downspout material to this length, using a hacksaw. Next, mark the center of the top of the downspout material. Draw a line from the center mark to the top left corner, and another line from the center mark to the top right corner. These lines will be used as a guide for cutting the 45-degree angles needed for the elbow.
Using a miter saw, cut the downspout material along the lines you drew, making sure to cut at a 45-degree angle. Once both cuts are made, the elbow should fit snugly onto the downspout. To secure the elbow, use screws or rivets. Finally, seal the joints with caulk or sealant to prevent leaks.
How do you connect gutter downspouts together?
- Begin by measuring the length of your gutters. You will need to purchase enough downspouts to match the length of your gutters.
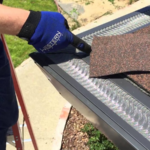
- Cut the downspouts to size, using a hacksaw. Make sure to wear gloves and safety goggles when cutting the downspouts.
- Connect the downspouts to the gutters using gutter brackets. Make sure the brackets are properly secured, using screws or nails.
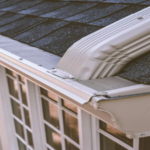
- Finally, connect the downspouts to each other using elbow joints. Make sure the joints are properly sealed to prevent leaks.
What is the difference between A and B downspout elbows?
A downspout elbow is a curved section of gutter that is used to direct rainwater away from the foundation of a house. B downspout elbows are also used to direct rainwater away from the foundation of a house, but they are installed at the base of the downspout instead of at the top.
What angles do downspout elbows come in?
There are a variety of angles that downspout elbows can come in, depending on the needs of the particular installation. The most common angles are 45 degrees and 90 degrees, but downspout elbows can also come in 22.5 degree, 67.5 degree, and 135 degree angles. In some cases, a custom angle may be needed in order to properly direct water flow.
How do you join two sections of a downspout?
In most cases, you will need to use a downspout coupling to join two sections of a downspout. You will first need to cut both ends of the downspout at a 45-degree angle. Then, you will need to slip the coupling over the end of one downspout section and secure it in place with sheet metal screws. You will then need to do the same with the other downspout section. Once both sections are secured, you will need to join the two sections together with sheet metal screws.
What’s the best way to join two gutters together?
- Use a gutter splice kit. This kit will come with everything you need to join the gutters together, including a splice, screws and sealant.
- Use a gutter sealant. This is a quick and easy way to join gutters together, but it is not as permanent as using a gutter splice kit.
- Use gutter hangers. This is the most permanent way to join gutters together, but it is also the most difficult. You will need to drill holes in the gutters and then screw the hangers into place.
How do you hook up a downspout connector?
You will need a downspout connector to connect your downspout to the drain pipe.
- Start by measuring the diameter of the downspout.
- Cut a piece of pipe that is the same diameter as the downspout.
- Slip the downspout connector onto the downspout.
- Use a hacksaw to cut the pipe to the desired length.
How do you connect two pieces of rain gutters?
- Begin by measuring the length of the gutter you will be connecting. Cut a piece of rain gutter to this length.
- Next, use a hacksaw to cut a notch in each end of the gutter. The notch should be about an inch deep.
- Place the gutter on a level surface and insert a piece of PVC pipe into each end of the notch.
- Finally, use PVC cement to glue the PVC pipe in place. Allow the cement to dry for 24 hours before using the rain gutter.
Bottom Line
If you’re looking to install a gutter downspout elbow, there are a few things you’ll need to keep in mind. First, make sure you have the right tools for the job. You’ll need a ladder, a drill, and a screwdriver. Second, measure the area where you’ll be installing the elbow, and mark the spot. Third, drill a hole in the marked spot, and insert the screwdriver. fourth, screw the elbow into the hole, and tighten with the drill. fifth, test the elbow by pouring water into the gutter above it to make sure it’s secure.