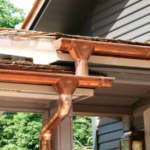
- Placement a ladder at one end of the seamless gutter run and climb up to make sure that you can get to the eaves.Use a tape
- step to figure out the length of the gutter run and cut a piece of rain gutter to size using a hacksaw.Place the seamless gutter under the drip side and utilize a drill to protect it in place with screws.Repeat actions 2-3 up until the entire rain gutter run is complete.Use a paintbrush to apply a layer of sealant to the
- seams where the seamless gutters intersect.Install rain gutter wall mounts at periods along the seamless gutter run and use them to secure the seamless gutters in place.Place a downspout at the end of the seamless gutter run and use screws to safeguard it in place.Use a hacksaw to reduce an item of downspout to dimension and connect it to the bottom of
- the rain gutter utilizing screws.Repeat steps 8-9 up until the whole seamless gutter system is complete. Do you put ice & water under drip edge? Most individuals believe that in order to correctly install a drip edge, you must first put ice and
water under the drip edge.
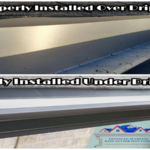
This is not the instance. You do not need to place ice and water under the drip side in order to mount it properly. Should gutters be put under drip edge? The answer to this question is a little bit of a matter of viewpoint. While some individuals think that it is best to tuck the
gutters under the drip side in order to keep water from seeping behind the seamless gutters, others think that this can actually trigger more problems than it addresses. Inevitably, it is up to the property owner to decide what is best for their home. Just how do you mount rain gutters under drip edge? Begin by gauging the length of the drip edge.Cut the rain gutters to the ideal length.Install the wall mounts for the rain gutters.Attach the gutter to the hangers.Test the rain gutters to ensure they are correctly set up and functioning. Does drip edge drop
before ice and water guard? Trickle side does not decrease prior to
ice and water shield. The purpose of drip side
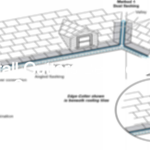
is to prolong beyond the edge of the roof covering material, so that water will certainly drip off the edge of the roofing as opposed to diminishing the side of the house.
Ice and water guard is a membrane that is installed under the roofing product to prevent water from permeating right into your house. Is it alright to put ice and water shield on entire roof? Yes, it is completely great to put ice and water guard on your whole roof covering. This is in fact an excellent idea, especially if you live in a location that obtains a great deal of snow and ice. The ice and water shield will certainly safeguard your roofing system from any kind of
water damage that can occur from the melting snow and ice. Do you pin down ice and water guard? Yes, you can nail down ice and water guard. There are special nails that are produced this purpose that you can purchase at your neighborhood hardware store. Make sure to comply with the supplier’s instructions when installing the ice and water shield. Exactly how do you mount drip side and ice and water shield? Begin by getting rid of any old drip side or
other product that may remain in the way. Make use of an energy knife or various other sharp tool to rack up any caulking or sealer that may be holding the old product in position, after that pry it away from the surface.Once the location is clear, action and reduce your brand-new drip side to size. If you’re making use of ice and water guard, lay it down first, after that position the drip side on top.Use a hammer
- or various other tool to toenail the drip side or ice and water shield in position. Ensure the nails are driven into a solid substratum such as a stud or joist.Seal any type of joints or seams with caulk or sealer, then allow it to dry completely.< iframe width=" 100%"height="
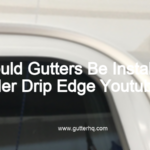
- 400″ src =”https://www.youtube.com/embed/WBr8HWxaFXs” > Bottom Line If you’re looking to mount gutters under your drip edge to avoid ice build-up, here are a couple of suggestions to assist you begin. Make certain you have the right tools for the work, consisting of a ladder, a degree, and a tape action. Next, define where you’ll be installing the seamless gutters, and then cut the gutters to size. As soon as you have the rain gutters cut, you’ll need to attach them
to the fascia board using screws and brackets. Lastly, seal the gutters with caulk to stop leaks. By following these actions, you can mount seamless gutters under your drip side to aid prevent ice accumulation.
Placement a ladder at one end of the seamless gutter run and climb up so that you can reach the eaves.Use a tape
measure to establish the length of the seamless gutter run and reduced an item of seamless gutter to size using a hacksaw.Place the seamless gutter under the drip side and use a drill to secure it in location with screws.Repeat actions 2-3 until the entire seamless gutter run is complete.Use a paintbrush to use a coat of sealant to the
joints where the rain gutters intersect.Install seamless gutter hangers at intervals along the seamless gutter run and use them to safeguard the rain gutters in place.Place a downspout at the end of the gutter run and usage screws to safeguard it in place.Use a hacksaw to cut a piece of downspout to size and connect it to the base of
the gutter using screws.Repeat steps 8-9 until the entire gutter system is complete. While some people think that it is best to put the
rain gutters under the drip side in order to maintain water from permeating behind the seamless gutters, others believe that this can actually cause more issues than it solves. Begin by measuring the size of the drip edge.Cut the rain gutters to the ideal length.Install the wall mounts for the rainfall gutters.Attach the rainfall seamless gutters to the hangers.Test the rain gutters to ensure they are effectively set up and operating. If you’re looking to set up rain gutters under your drip side to stop ice build-up, below are a few tips to help you get started. Next, mark out where you’ll be setting up the gutters, and after that reduced the rain gutters to dimension.
Other Gutter Articles that May Interest You
-
How To Install Gutters Under Drip Edge IceBegin by removing any old gutters and downspouts. If your home doesn't have gutters, you'll need to install them before you can install gutters under the drip edge ice.Next, measure the length of your home's eaves and purchase enough gutters…
-
How To Install Gutters Under Drip Edge IcePosition a ladder at one end of the gutter run and climb up so that you can reach the eaves.Use a tape measure to determine the length of the gutter run and cut a piece of gutter to size using…
-
-
Do You Install Gutters Under Drip EdgeThe drip edge is the metal strip that runs along the edge of your roof. It's purpose is to prevent water from running back under the shingles and causing leaks.The gutters are installed under the drip edge to direct the…
-
Can You Install Drip Edge After GuttersCan drip edge be installed later? Yes, drip edge can be installed later, but it is not recommended. Drip edge should be installed when the roof is being installed to ensure that it is properly installed and does not cause…
-
Do You Install Gutters Before Drip EdgeThere is no right or wrong answer to this question, as both options have their pros and cons. Installing gutters before the drip edge gives you more control over the runoff and prevents leaves and debris from clogging the system.…
-
-
Install Gutters Behind Drip Edge?In most cases, your builder will install gutters behind the drip edge, but it’s not unheard of to see them in front. There are a few reasons for this. First, it’s easier to install the gutters before the drip edge…
-
Do Gutters Get Installed Under Drip EdgeMost drip edges are installed flush with the edge of the roof, which means the gutter is installed on top of the drip edge. However, some roofers will install the gutter underneath the drip edge if it is possible to…
-
Do Gutters Get Installed Under Drip EdgeDrip edge is a metal flashing that is installed along the edges of your roof. It helps to keep water from running down the sides of your house and causing damage. Gutters are installed under the drip edge to catch…
-
How To Install Drip Edge With GuttersBegin by measuring the length of your gutter run. You will need one piece of drip edge for each gutter section.Cut the drip edge to size using a hacksaw or power saw.Install the drip edge onto the gutter run, starting…
-
How To Install Gutters And Drip EdgeBegin by measuring the length of your home’s eaves. This will determine how much gutter material you’ll need to purchase.Next, install the gutter hangers along the length of the eaves. Be sure to space them evenly.Once the hangers are in…
-
Should Gutters Be Installed Under Drip Edge YoutubeThere is no easy answer when it comes to deciding whether or not to install gutters under your drip edge. On one hand, gutters can help to protect your home from water damage by channeling water away from your foundation.…
-
How To Install Drip Edge And GuttersThe first step is to purchase your materials. You will need to get drip edge, gutters, hangers, end caps, and downspouts. Once you have all of your materials, you will need to measure the length of your roof. You will…
-
Should I Install Drip Edge Before Installing GuttersInstalling a drip edge is a relatively simple process and can be done by most do-it-yourselfers. However, if you are not comfortable working on your roof, you can always hire a professional roofing contractor to install the drip edge for…
-
How To Install Drip Edge And GuttersTo install drip edge, first measure and cut the drip edge to the desired length.Next, nail the drip edge to the fascia board, making sure that the nails are driven into the furring strip.Once the drip edge is in place,…