First, find the spot where you want to install the pop up drain. It is important to make sure that the drain is installed in an area where the water will flow away from your home or business.
Next, measure the area where the drain will be installed. You will need to know the dimensions of the area so that you can purchase the correct size drain.
Once you have the correct size drain, you will need to cut a hole in the gutter. The size of the hole will be determined by the size of the drain.
After the hole is cut, you will need to insert the drain into the hole. Make sure that the drain is inserted correctly so that it will not leak.
Finally, you will need to seal the drain with caulking. This will ensure that the drain is installed correctly and will not leak.
How do you install a pop-up drain pipe?
Installing a pop-up drain pipe is a relatively easy task that can be completed in a few minutes with a few tools. The first step is to remove the old drain pipe. This can be done by unscrewing the pipe from the drain or by using a hacksaw to cut the pipe. Next, the new drain pipe needs to be attached to the drain. This can be done by screwing the pipe into the drain or by using a slip joint coupling. Finally, the pop-up drain stopper needs to be installed. This can be done by screwing the stopper into the drain or by using a push-fit connection.
How do I install pop-up emitters?
Pop-up emitters are a type of irrigation device that are installed underground and pop up when watering is needed. They are a great option for irrigating lawns and gardens, and can be programmed to water on a schedule. Installing pop-up emitters is a relatively simple process, and can be done in a few easy steps.
Choose a location for the emitters. Pop-up emitters should be installed in an area that is away from foot traffic, as they will be underground. It is also important to choose an area with good drainage.
Dig a hole for each emitter. The holes should be about 6 inches deep and wide enough to accommodate the emitter.
Install the emitters. Place the emitters in the holes and secure them in place with dirt or rocks.
Connect the emitters to your irrigation system. Pop-up emitters must be connected to an irrigation system in order to function.
Set the emitters to water on a schedule. Most pop-up emitters have a built-in timer that can be set to water on a specific schedule.
Installing pop-up emitters is a great way to automate your irrigation system and make watering your lawn or garden easier. Follow these simple steps to install your own pop-up emitters.
Do pop-up gutter drains work?
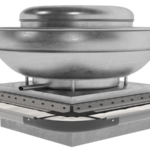
A pop-up gutter drain is a type of drainage system that is installed on the ground near the foundation of a house. The pop-up gutter drain consists of a perforated pipe that is buried in the ground and a catch basin that is placed at the end of the pipe. The catch basin collects the water that drains from the perforated pipe and directs it away from the foundation of the house.
The pop-up gutter drain system is designed to work with the natural slope of the land to direct water away from the foundation of the house. The perforated pipe is installed on the high side of the slope and the catch basin is installed on the low side of the slope. The catch basin is usually connected to a drainage system that drains the water away from the house.
The pop-up gutter drain system is an effective way to prevent water from draining towards the foundation of the house. The system is easy to install and does not require any maintenance.
Do pop-up emitters work for yard drainage?
Pop-up emitters are a type of drainage device that is commonly used in residential yards. They are placed in strategic locations within the yard, and when it rains, they pop up and release water from the yard, helping to prevent flooding.
Last Word
If you’re looking to install a pop up drain from your gutter, the process is actually quite simple. All you need is a few tools and some patience and you’ll be all set. Just follow the steps outlined in this blog post and you’ll be good to go.
Pop up gutter drains are a great way to keep your gutters clear of debris and water.To install a pop up gutter drain, first you will need to measure the inside diameter of your gutter.Cut a hole in the bottom…
Locate the area where you want to install the pop up gutter drain pipe.Cut a hole in the gutter using a hole saw or jigsaw.Insert the pop up gutter drain pipe into the hole.Seal the pipe to the gutter using…
How deep should I bury my gutter drain pipe? The trench must be at least 10-inches-deep, but be aware that in cold-weather regions the pipe occasionally will clog with ice during periods of heavy precipitation. What is the best pipe…
Before beginning any work, make sure that you have all of the necessary tools and materials on hand. You will need a hacksaw, a screwdriver, a drill, a pop up drain, and a gutter.The first step is to measure the…
If you are having problems with water pooling around your home, you may want to consider installing a pop-up gutter drain. This type of drain is designed to collect water from your gutters and direct it away from your home,…
How much should labor cost to install gutters? How much does it cost to install gutters per foot? Having seamless aluminum gutters professionally installed on your home will cost around $7 to $33 per linear foot. The average per-foot cost…
How deep should gutter drain pipe be? The trench must be at least 10-inches-deep, but be aware that in cold-weather regions the pipe occasionally will clog with ice during periods of heavy precipitation. What kind of pipe do you use…
Locate the downspout on the gutter system.Cut a hole in the bottom of the downspout using a sharp knife.Place the gutter drain pipe over the hole in the downspout.Secure the gutter drain pipe to the downspout using screws or zip…
Begin by clearing any debris from the gutter. This will make it easier to see what you're doing and avoid any potential clogs.Once the gutter is clear, locate the downspout. This is the pipe that carries water away from the…
First, measure the length of your rain gutter and mark where you want the pop up to be installed.Next, cut a hole in the rain gutter using a power drill or other cutting tool.Install the pop up by inserting it…
Begin by measuring the length of your gutter and cutting the downspout to size.Next, mark the location of the gutter pop ups on the downspout.Drill a hole at each mark, making sure the holes are slightly larger than the diameter…
Begin by measuring the inside of your gutter using a tape measure. You will need to cut a piece of PVC pipe that is slightly longer than the inside of your gutter.Cut the PVC pipe using a hacksaw.Place the PVC…
Determine the location of the downspout. The downspout is the pipe that carries water from the gutter to the ground. It is usually located at the corner of the house.Measure the length of the downspout. You will need to know…
To install a gutter drain, first measure the inside width of your gutter and cut a piece of drain pipe to size.Next, mark the location of the drain on the gutter and drill a hole for the pipe.Insert the pipe…
Start by finding the location of your downspout. Typically, this will be near the edge of your roof where the gutter meets the house.Once you have found the location of the downspout, measure the distance from the edge of the…
Begin by measuring the inside width of your rain gutter.Cut a length of drain pipe that is slightly longer than the inside width of your gutter.Connect one end of the drain pipe to the gutter using a drain coupling.Connect the…