How To Install Gutter Clip And Push Up The Drip Edge
by
Gather your materials. You will need a gutter clip, a push up tool, and a level.
Place the gutter clip on the top of the gutter and use the push up tool to gently push the drip edge up.
Use the level to make sure the drip edge is level before securing the gutter clip.
Repeat this process until all of the gutters are clipped and the drip edge is level.
How do you install gutters over drip edges?
Start by measuring the length of the gutter you will be installing.
Next, cut your gutter to size.
Install the gutter hangers onto the drip edge.
Finally, slide the gutter into place and secure it with the hangers.
Do gutter hangers go under drip edge?
Yes, gutter hangers are typically installed underneath the drip edge. The drip edge is the metal strip that is installed at the edge of the roof to help direct water into the gutters. The gutter hangers help to keep the gutters secured to the edge of the roof and prevent them from falling off or becoming detached.
How do you attach gutter clips?
There are a few different ways to attach gutter clips, depending on the type of clip and the gutter material. For example, some clips have prongs that can be inserted into pre-drilled holes in the gutter, while others have to be screwed or nailed into place. In either case, it’s important to make sure the clips are properly aligned before attaching them, so that the gutters will hang straight and function properly.
Can you install gutter apron and drip edge?
A gutter apron is a metal or plastic strip that is installed under the shingles and over the gutter to help prevent water and debris from entering the gutter. A drip edge is a metal or plastic strip that is installed over the edge of the roof to help prevent water and debris from entering the home.
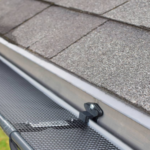
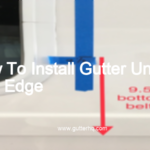
How far should drip edge extend into gutter?
A drip edge is a metal flashing that is installed on the lower edge of a roof. The drip edge helps to keep water from seeping under the shingles and causing damage to the roof.
The drip edge should extend into the gutter a minimum of 3/4 inch. This will ensure that the water is directed into the gutter and away from the roof.
If the drip edge is not installed properly, it can cause the gutters to become clogged with debris. This can lead to water damage and even flooding.
It is important to consult with a professional roofer to ensure that the drip edge is installed correctly. Improper installation can void the warranty on your roof.
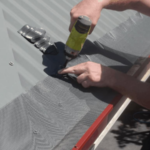
How do you stop a leak between drip edge and gutter?
The most common way to stop a leak between the drip edge and gutter is by using silicone caulk. You can also use a gutter sealant, but silicone caulk is typically the best option. You will want to clean both the drip edge and gutter before applying the silicone caulk. Once the area is clean, you can apply the caulk with a caulk gun. You will want to apply the caulk in a continuous bead until the entire leak is sealed.
What is the proper way to install drip edge on a roof?
There are a few things to keep in mind when installing drip edge on a roof. First, make sure that the drip edge is the correct size for the roof. Second, be sure to install the drip edge flush with the edge of the roof. Third, use roofing nails or screws to secure the drip edge in place. Finally, seal the drip edge with roofing cement or caulk.
Bottom Line
Assuming you have all the necessary tools and materials, installing a gutter clip and pushing up the drip edge is actually quite simple. Just follow the steps outlined in this blog post and you should have no problem getting the job done.
Should drip edge be nailed to fascia? A metal drip edge will help protect the sheathing under the roof, but if it's installed too closely to the fascia board, it can still cause water to be drawn into the fascia.…
Installing drip edge and gutter is a simple and easy process that anyone can do.You will need some basic tools and materials including a level, tape measure, hacksaw, and screws.Begin by measuring the length of your gutter and cutting the…
Begin by measuring the length of your gutter. You will need to purchase a gutter drip edge that is slightly longer than your gutter.Cut the drip edge to size with a hacksaw.Install the drip edge onto the gutter by nailing…
You can install gutter apron over drip edge as long as the drip edge is properly installed and in good condition. The apron will help to protect the drip edge from getting clogged with debris and will also help to…
How far below the drip edge should the gutter be? There is no definitive answer to this question as it depends on a number of factors, such as the type of roof, the climate, and the amount of rainfall. However,…
Begin by measuring the length of your gutter.Cut the drip edge to size, using a hacksaw or power saw.Install the drip edge by nailing it into the gutter, with the drip edge facing downwards. What is the proper way to…
Most roofers will install drip edge on your home if you request it. Drip edge is a metal flashing that helps to keep water from seeping under your shingles and causing damage to your roof deck or home interior. Should…
drip edge is not installed OVER the gutter, but rather underneath it. The drip edge is installed so that the edge of the metal is even with the outside edge of the gutter. The gutter is then installed on top…
Begin by removing any dirt or debris from the surface of the gutter using a putty knife.Next, use a measuring tape to measure the length of the gutter.Cut a piece of drip edge to the same length as the gutter,…
Measure the length of your gutter run and cut the gutters to size.Install hangers at the appropriate intervals along the length of the gutter.Suspend the gutters from the hangers and position them so that the lip of the gutter is…
Begin by measuring the length of your gutter run. You will need one piece of drip edge for each gutter section.Cut the drip edge to size using a hacksaw or power saw.Install the drip edge onto the gutter run, starting…
Remove any old drip edge and clean the surface.Make sure the new drip edge is the same size and shape as the old one.Nail the new drip edge in place with the nails provided.Make sure the drip edge is properly…
Can drip edge be installed later? Yes, drip edge can be installed later, but it is not recommended. Drip edge should be installed when the roof is being installed to ensure that it is properly installed and does not cause…
To install a rain gutter with a drip edge, you will need a few tools and materials. A level, tape measure, drill, saw, and screws are required. You will also need to purchase the rain gutter and drip edge from…
Begin by removing any old drip edge that is already on the gutter. This can be done with a utility knife or a screwdriver.Next, measure the length of the gutter and cut the drip edge to size. Make sure to…
There is no right or wrong answer to this question, as both options have their pros and cons. Installing gutters before the drip edge gives you more control over the runoff and prevents leaves and debris from clogging the system.…