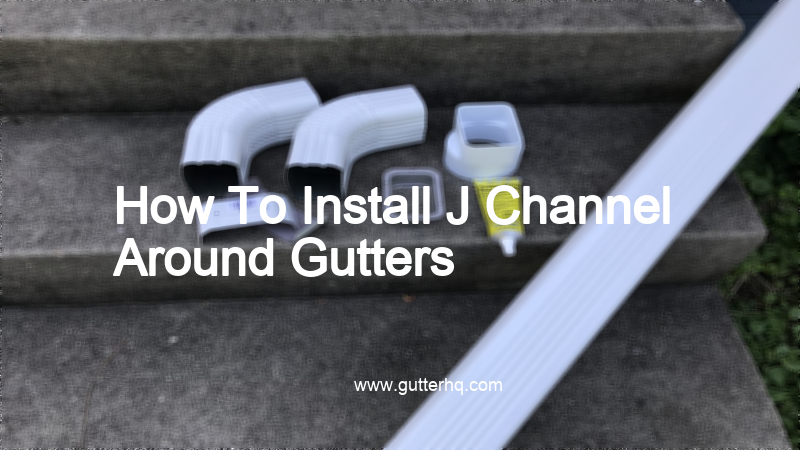
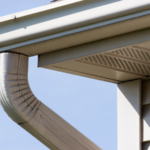
Using a tape measure, calculate the length of the J channel needed for the gutter. Add an extra 3 inches to account for overlap.
Cut the J channel to size with a hacksaw.
Apply a bead of caulk around the edge of the gutter.
Place the J channel over the caulk and press it into place.
Nail the J channel to the gutter with roofing nails. Space the nails every 8 inches.
Apply another bead of caulk over the top of the J channel.
Place the gutter cover over the J channel and press it into place.
How do you fasten J channel?
J channel is fastened using a variety of methods, depending on the application. For example, it can be screwed, nailed, or glued to the substrate.
In some cases, J channel can be fastened using special clips or brackets. These are typically made of metal or plastic, and they help to secure the J channel in place.
In other cases, J channel can be fastened using adhesive tape. This is often done in applications where the J channel will be exposed to moisture or high humidity levels.
How far apart do you nail J channel?
J channel should be nailed every 12 inches on center.
If you are using J channel for a soffit application, you will want to use a slightly different spacing.
For soffits, you will want to space your J channel nails every 16 inches on center.
This will ensure that your soffit stays strong and secure, and will also help to prevent any water damage.
Do you overlap J channel?
There’s a few reasons you might want to install J-channel around your windows. Maybe you’re doing a renovation and want to add a little extra protection to your windows. Or maybe you live in an area with severe weather conditions and want to make sure your windows can withstand the elements. Whatever the reason, installing J-channel is a relatively simple process that anyone can do with a little time and patience.
To install J-channel, start by measuring the perimeter of the window. Then, cut the J-channel to size using a hacksaw or power saw. Next, apply a bead of silicone caulk to the top and sides of the window. This will help create a weather-tight seal. Finally, press the J-channel into place and use a hammer or screwdriver to secure it.
Do you nail J Channel tight?
Another way to do it is to use a piece of wood to support the J Channel. This is a good method to use if you are working with a softer material, or if you are worried about the J Channel pulling away from the wall.
Can you use screws for J channel?
No, you cannot use screws for J channel. J channel is a type of trim that is used to cover the edges of roofs and walls. It is made of metal or plastic and has a flange that protrudes out from the surface it is installed on. The flange is used to attach the J channel to the surface.
How to install J channel in corners?
To install J channel in corners, start by measuring the length of the wall and cutting the J channel to size. Next, use a nail gun to attach the J channel to the wall, starting at the top and working your way down. Be sure to use a level to keep the J channel straight.
Once the J channel is in place, you can then install the siding. Start at the bottom and work your way up, overlapping each course as you go. When you get to the corners, simply cut the siding to fit and then nail it in place.
That’s it! Once the siding is in place, you can then caulk around the edges of the J channel to create a weather-tight seal.
Does J channel need to be caulked?
J channel does not need to be caulked as it is designed to create a tight seal against the house. However, if there are any gaps or cracks in the J channel, caulk can be used to fill them in and create an even tighter seal.
Final Talk
J channel installation is a great way to keep your gutters clean and free of debris. By following these simple steps, you can ensure that your gutters will stay in good condition for years to come.
How much should labor cost to install gutters? How much does it cost to install gutters per foot? Having seamless aluminum gutters professionally installed on your home will cost around $7 to $33 per linear foot. The average per-foot cost…
How much does home Depot charge for gutters? Home Depot generally charges around $200 for gutters, give or take a few dollars depending on the style and material of the gutter.Some factors that can affect pricing include the length and…
Gutters are installed by professional contractors. The process begins with a consultation to determine the best type of gutters for your home. Once the type of gutters is selected, the contractor will measure the eaves of your home and cut…
Can I install gutters myself? Gutters are most often installed by professionals, but there's no reason you can't do it yourself. All the materials and accessories are readily available at home centers, lumberyards, and roofing-supply firms. What is the proper…
Can I install gutter guards myself? If you have some general handyman skills, you should be able to install most types of gutter guards without a problem. But keep in mind that some gutter guards are more difficult to install…
What is the labor cost to install gutter guards? All American Gutter Protection costs between $15 and $20 per linear foot for guards and professional installation. Does Lowes install gutters? Lowes is a full-service gutter installation company that offers several…
A gutter is a narrow channel, groove or depression in the surface of a road or path, typically between two curbs, used to collect rainwater from the road surface.There are a number of different types of gutters that can be…
How far apart should gutter wedges be? If you live in a warm area with less rain, then you should install your gutter hangers near the middle of the gutter every 24 inches or where there is a rafter. For…
Can you install gutters yourself? Gutters are most often installed by professionals, but there's no reason you can't do it yourself. All the materials and accessories are readily available at home centers, lumberyards, and roofing-supply firms. Is it worth doing…
Installing gutters is a job that is best left to the professionals. While it may seem like a simple enough task, there are a number of things that can go wrong if you don't know what you're doing. From choosing…
If you are looking to install a rain gutter, there are a few things you will need to take into consideration. First, you will need to determine the size of the gutter you will need. The size of the gutter…
What does home Depot charge to install gutters? At Home Depot, the cost of gutter installation varies depending on the type and size of gutters you choose. The average cost for gutters and downspouts is between $6 and $12 per…
Can I install gutter Helmet myself? One installation misstep, and you could accidentally break or bend your gutters. Worse, you could cause damage leading to voiding the warranty on the gutters and even the whole roof. This is why hiring…
Yes, Lowe's offers gutter installation services. You can schedule a free in-home consultation to have a Lowe’s installation professional assess your gutter needs and provide a recommendation. After the consultation, you can choose to have Lowe’s install your gutters or…
If you're looking to install gutters on your home, there are a few things you need to know. First, you'll need to decide what type of gutter material you want to use. There are many options available on the market,…
Begin by measuring the length of the gutter you will be installing.Cut your gutter to size using a hacksaw or similar tool.Next, predrill holes into the gutter using a drill bit that is slightly smaller than the screws you will…